 Unless you are really heavily into photography, you might not realize the many different ways in which Adobe Lightroom can improve your photos. In my last blog post I spoke about the importance of shooting photos using the RAW file format versus the camera’s default JPG files. Today I’ll talk a bit about using Lightroom to process your photos and what a big difference it can make to Real Estate property photos.
Let’s be clear…you don’t necessarily have to shoot in RAW format in order to take advantage of many of Lightroom’s features. You just have a lot more options at your disposal if you’re starting with a RAW file versus a JPG. But many of the tips I’ll share with you today will work even if your source file is a JPG.
1. Lightroom Corrects for Distortion
One of the biggest problems I see when looking at property photos is distortion. This can manifest itself in many different ways, but the biggest problem is when vertical lines aren’t vertical. You may never have even realized that you’re making this mistake, but once you see the problem you won’t forget it. Here’s an example:

This is not an uncommon example. An agent stands in a room and holds the camera up to his face and snaps a shot. The problem is that you’re looking down on the room, which makes the vertical walls distorted. While I’d say your first solution is to make sure your camera is level when you take the photo in the first place, you can fix this problem using the Lens Corrections feature in the distortion panel.
2. Lightroom Exports Multiple Sizes Automatically

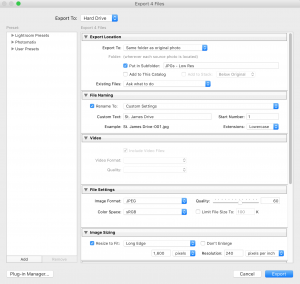
Depending on what MLS system your association uses, you are probably limited in the dimensions &/or file size you are allowed to upload to your listing. This can be a pain in the butt to resize dozens of photos just so that you can get them sized appropriately for online use. Lightroom makes this a breeze through their File Export dialog. I actually create three copies of all my photos…one in high resolution (for printing), one at low resolution (for uploading to the MLS) and a third at low resolution with a watermark for using on other websites (such as Craigslist…or if you’re a Keller Williams agent, for use in KWLS). I’m able to do this in a matter of seconds. Lightroom will even process multiple export jobs simultaneously, allowing you to trigger all your different presets and not have to wait for it to finish one before you start the others.
3. Lightroom Corrects White Balance
White Balance can be a pain when it comes to Real Estate photography. Unless you are going to the trouble of manually setting the correct white balance for every photo you take, you are using the automatic white balance setting in your camera. Most of the time that will work just fine, but sometimes (especially in rooms with fluorescent bulbs) the camera can get fooled. The result is a photo where the colors all look “off”…like with a yellowish or greenish tinge to it. If you’re shooting in the RAW file format, fixing this in Lightroom is as easy as clicking a dropdown to select the right one (such as “fluorescent”. With a JPG source file you’ll have to adjust the color temperature manually…but at least you have the ability to fix it.
4. Adjusting Exposure
Just like getting distortion issues right in the camera, you should always try to get the exposure right at the time of the shoot as well. But that may not necessarily make the perfect photo when it comes to Real Estate photos where the dynamic range of the room you’re shooting is likely going to be wider than what the camera can capture. Lightroom allows you to recapture some of the lost detail in your photos by adjusting exposure, highlights, shadows etc. to make the photo more realistic. This is one area where having a RAW source file will pay huge dividends as it contains much more image data than a JPG file, allowing you to adjust those settings further.
5. Lightroom is Non-Destructive
The changes and tweaks you make to your photos do not actually affect the original source file. Why should you care about this? Well, this allows you to go back and adjust things later on if you need to and not be forced to make adjustments on top of adjustments (with the associated degradation of quality that goes along with that). If you make a bunch of changes in Lightroom and decide after a while that you just biffed it big time, it’s no problem. Just click the “reset” button in the lower right corner to take your photo back to its original state and start over again.
6. Lightroom Keeps You Organized
Lightroom is, at its most basic level, a database. It’s a database with a front end that allows you to make changes to your photos, but all its doing is saving those modifications to a database (which is why it is non-destructive!). Databases are perfect for keeping items organized as well. When you import photos into Lightroom, you can add them to folders specific to a particular listing. Within Lightroom you can also create “collections” of photos and even add individual photos to multiple collections. This is great if you need to go back and find photos from an old listing, or if you want to keep a separate collection of your “Greatest Hits” pics to show at future listing presentations. By adding metadata to your photos you can make it simple to search for photos at a later date, add copyright information to protect you from having others steal your photos.
This post really is just scratching the surface on ways in which you can use Adobe Lightroom to improve your photography workflow and save you time. For a more in-depth look at how you can use Lightroom in your real estate business, sign your office up for our class on using Lightroom for Real Estate. We never charge a per-person fee, so your office can invite as many attendees as you want.
Leave a Reply
You must be logged in to post a comment.